
I’ve heard a lot about dockers, even had some experience with it as part of my graduate degree. Still, as the old saying goes, learning is by doing. By doing, I mean using the stuff you want to learn as part of your daily work (instead of using it as part of a course in a semester since it will be forgotten). Actually, this is a technology that, in my perspective, should be in some familiarity level in each software engineer’s tech stack.
This is the first part in a series about simplifying Docker usage. In this blog post, I’ll talk about Docker, a container platform that allows to create containers’ images, build them, and more. Duly note that Docker is not unique, you can find containerd, rkt , lxd, and others, but it is one of the popular container platforms out there.
Ok, I’m convinced— what’s a container? Link to heading

container magic
Containers are software units that package up code and its dependencies so that applications can run quickly and efficiently across different environments. Wait? Some would read it and say that I’m talking about a virtual machine. While it may sound the same, they are different in their purpose. A container is mobile and light. It abstracts the application layer while a VM takes more space, and its whole purpose is to virtualize physical hardware, as can be seen in the image below:
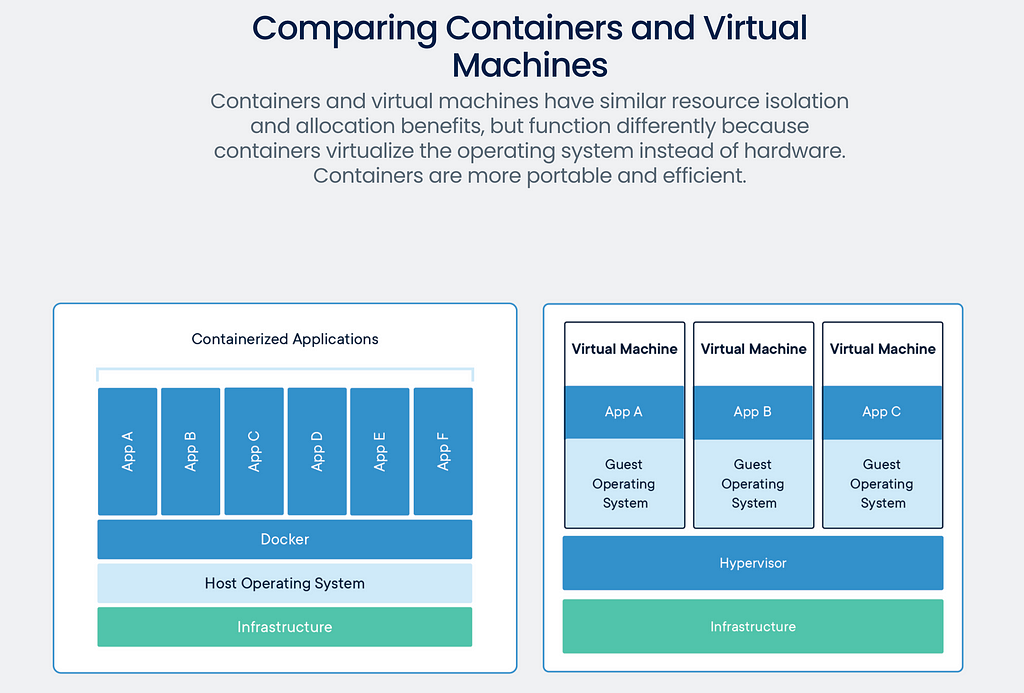
Container vs. VM
Basically, the container solves the “it works on my machine” syndrome.

It works on my machine
Getting started Link to heading
First, install docker from here Get Docker
Now, when dealing with docker, there are two essential terms, image, and container. To create a new container, one should write a Dockerfile (I learned the hard way the d should be a capital letter), and it describes how the container will be built. Using docker build an image will be generated out of it. This image can be moved from place to place; it is ready to use as is. Image can be a building block for other Dockerfiles.
For using the image, we’ll do docker run which creates a container out of the image. It is possible to run multiple instances of the container.
Dockerfile a recipe for an image Link to heading
FROM ubuntu:latest
RUN apt-get update && apt-get -y install sysstat
ENTRYPOINT [“/bin/bash/”]
In the first line, the FROM states the image on which our image relies; we can start from scratch too, but it is more common to point to a specific operating system. This is why it is called a base image. Here its ubuntu:latest.
In the second line, the RUN is used. Its purpose is to run a command while the image is being built. In my example, it will run an update of apt-get and then installs sysstat. This command always creates a new intermediate image layer on top of the previous ones. That’s why it is always recommended to chain all the RUN commands together.
Lastly, ENTRYPOINT will run a command in command-line (with arguments as opposed to CMD command — more on that on part II). In this case, it will run bin/bash Meaning once the image is up, we will get a bash terminal open and running.

now what?!
So, how can we use it?! Link to heading
We will use a docker command. Each starts with docker and for building the recipe we’ve just created, we’ll do docker build -t image_name:tag_name path_to_Dockerfile, the -t flag adds a terminal driver for outputting the stdout to the terminal. In the GIF below,image_name is my app and tag is 1.0 and right after appears a dot (oh, the mighty dot), which is there for a reason (not a typo), meaning path_to_Dockerfileis the current location. BTW, you don’t have to set a tag; docker will mark it as latest automatically. Tags provide a versioning mechanism for the same image recipe.
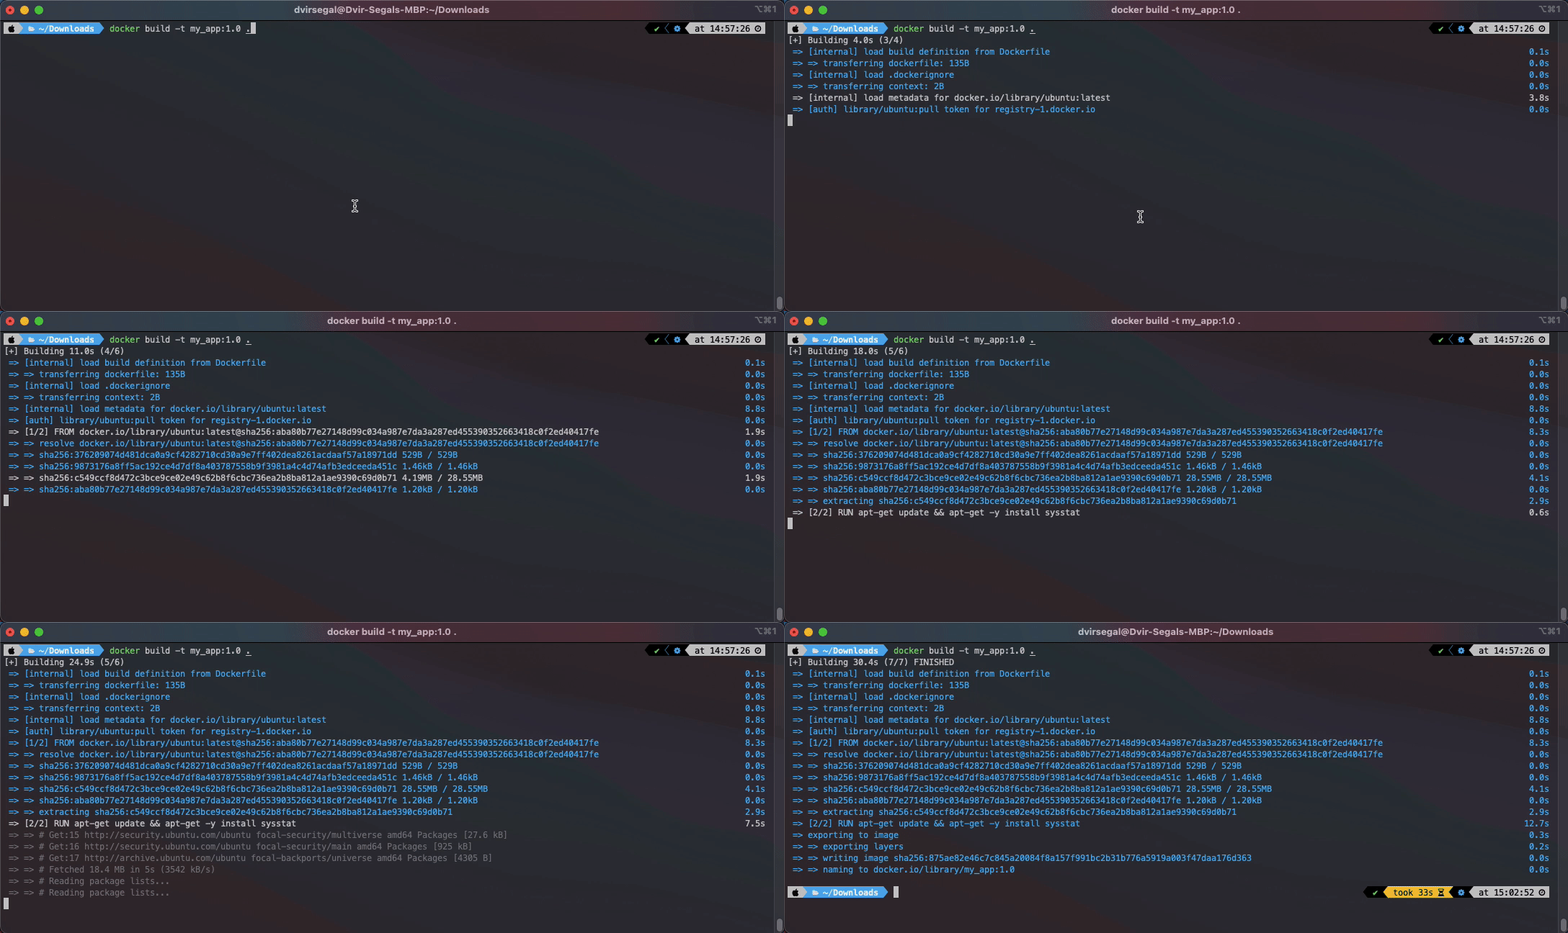
After it finished, we can run docker images, and we’ll see the following output contains the name, tag, the unique image ID, date, and size:
REPOSITORY TAG IMAGE ID CREATED SIZE
my_app 1.0 875ae82e46c7 39 minutes ago 105MB
If I rerun the command without the tag, docker will recognize it as the same image (by the ID) and mark it with the latest tag:
REPOSITORY TAG IMAGE ID CREATED SIZE
my_app 1.0 875ae82e46c7 47 minutes ago 105MB
my_app latest 875ae82e46c7 47 minutes ago 105MB
Again? It will show that Docker is smart enough to identify that no change was done, resulting in the same image version. It can be inferred based on the creation time, which we’ve built the initial image.
To delete, simply run docker rmi my-app:1.0, then the list will show only one image. Another critical point to understand is what happens when you create an image with the same name and tag with new logic. The old one is set with
REPOSITORY TAG IMAGE ID CREATED SIZE
my_app latest ab422fb19450 4 seconds ago 105MB
<none> <none> 875ae82e46c7 7 hours ago 105MB
This state is called dangling (between life and death).

Dangling images
To delete the dangling images, just do docker image prune.
That’s it for this part; I hope you’ve found it relevant and as simplified as it can be. More on running images, using docker repository, etc. on part II